Thursday, May 31, 2012

Mist Four Ways

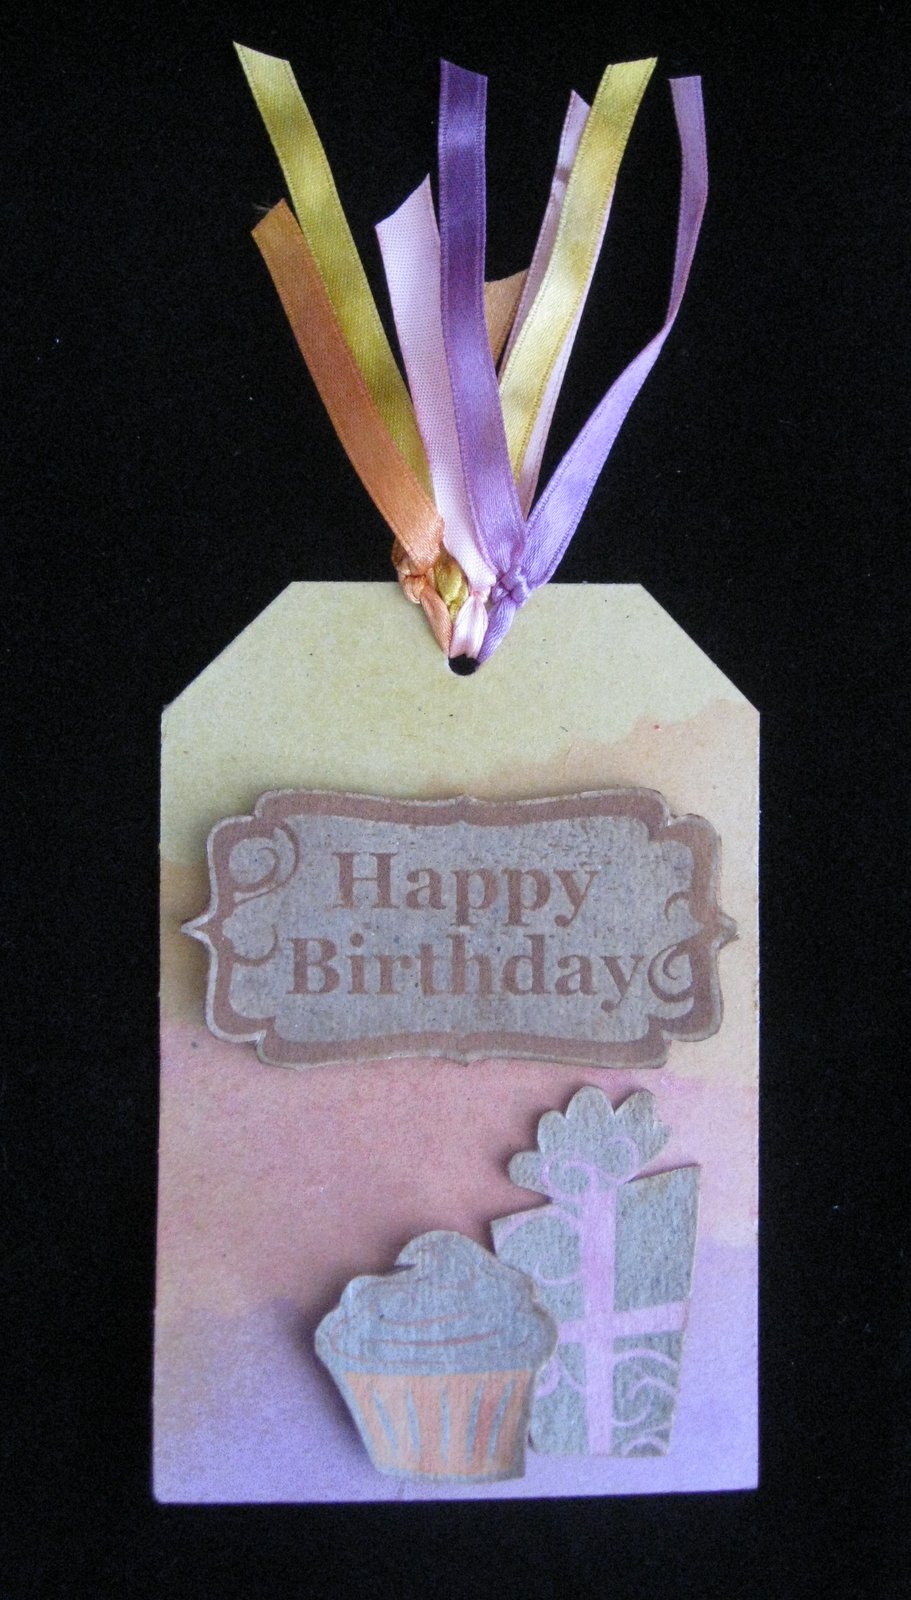
Cindy here!  I'm a big fan of mists.  They are really versatile and so much fun.  Today I'm going to share four of my favorite misting techniques and show how they can all come together to make one awesome tag.  

Using a border punch as a stencil
Punch a piece of scrap cardstock with a border punch (I used Fiskars Scalloped Sentiment) to create a stencil.  Place it over a tag, then spray with the lightest mist color.  Move the stencil and spray with the next darkest color.  Continue 1-3 more times, finishing with the darkest color. 
 
Misting over an embossed image
Stamp an image and emboss.  (I used Versamark ink and clear embossing powder on chipboard.)  Spray over the embossed image and immediately wipe with a tissue. 

 
Painting with mist over an embossed image
Stamp an image and emboss.  Spray mist onto a non-stick surface (I use the outside of a used sandwich bag.) or simply remove the cap from the mist.  Use a small paintbrush to paint directly on the non-embossed parts of the image. 


Dyeing ribbon with mist
Place scraps of white ribbon into a ziplock bag.  Spray a small amount of mist into the bag, seal, and massage to spread color evenly.  Remove the ribbon from the bag and lay it on a flat surface to dry (I use the inside of a cardboard box).  


Here's the chipboard tag I created, using mist four different ways.


Try experimenting with a cardstock base (or priming the chipboard with paint first), different ink or embossing powder, and various shades of mist.  The possibilities are endless!


Wednesday, May 30, 2012

Designer Showcase: Vintage!

What comes to mind when you hear the word vintage? There are many things that come to mind for me. On one hand I think of those heritage photos, but I also think of vintage patterns, vintage florals, and modern vintage arrangements. The contributors did a great job creating vintage projects. I know these will inspire you to capture that "vintage feel" to your future projects.

This first page by our newest contributor, Lesley, is a vintage layout of her grandfather. She created this vintage look with distressing and old ephemera that was the printed tissue paper which she scrunched and inked to age it a bit. Lesley also does some so cool, that I never thought of. She takes a copy of the original and like all my vintage/heritage photos, she places the original behind the matting of the photo to avoid it getting damaged. Great idea!!

This second project is so great for heritage. She used so many cool ephemera items for her page, things so found here and there and other items she created with ink! This is a true treasure.

Check out the color scheme of her layout above.  It reflects the photo of younger persons rather than a dark and heavy page. Don't you love the soft blues and browns and the ribbon ties on the side!

On this layout the burgundy mulberry strip is it actually lifts up the copied photo and the original is behind it. I love this idea as I stated above! The colors and items fit this perfectly!

This last page by Lesley uses those vintage prints and flower which really tie into the photo. With cut out flower and an antique looking alphabet, Lesley created a very nice vintage page.


Vicky created these next three layouts. This first layout captures the real beauty of vintage. With a soft blue and brown along with vintage looking swirlies and butterflies, Vicky captured the mood perfectly!

Vicky's next page using some stunning vintage-like patterned papers and a neat border of two toned flowers to create her page. I really like the color combos of black and a light peach.

On this next layout, Vicky layered all of the gorgeous vintage items neat or underneath her photo. Again the nice color scheme really enhances this page design. Notice those stamps coming out from under the photo, just love that touch!


This framed page by Cathy does a great job of capturing the vintage look. From doilies to old clocks and folded flowers, she does a great job of turning modern photos into a vintage look. She also created a monotone look for her page.

Cathy's card does an amazing job of creating the vintage look. These purple flowers remind me sooo much of my grandma and her bedroom. She loved this exact color and so I instantly vintage. When creating vintage projects remember it ok to use happy colors like this. The ribbon helps tie together that look so well.

Have fun creating your next vintage project!

Tuesday, May 29, 2012

A New Hexagon Template & Sketch

Hi, it's Dolores here today to share a new template and sketch.  Hexagon shapes have been so popular that I thought I would try my hand at creating a template with them.  Hexagons are a great shape for utilizing many different papers and are an easy shape to build a beautiful background.  I think they create a pleasing look because everything on the page feels so connected.  Here is my layout with our sweet lab Maggie titled "3 Toys."


Never have we had a dog that liked toys more than Maggie.  She picks up as many as she can and follows me around until I give her some playtime.  This layout was created with a beautiful kit full of spring colors called "A Sunny Disposition" by Sherwood Studio.  Here is the sketch for our paper scrapbookers.


I have created a template file in PhotoShop that can be downloaded at either of the two file sharing sites below.


Have some fun with the hexagon shape!  Hope you enjoy the template and sketch.  Happy Scrapping!


Monday, May 28, 2012

Using Embossing Powder on a Beach Page


Hi, Marlene here.  Last weekend I had the pleasure of attending the Great Lakes MegaMeet Scrapbook Convention in Novi, Michigan.  It is always fun to get to see new products first hand.  My favorite find for this year was Mudd Puddles (MuddPuddles.net).  At first glance I thought it was heat embossing powder but the granuales are much larger and heat is not used at all.   The vendor sold 4 different colors - sand, snow, splash sand (blue) and black - packaged with a tray, a brush and two-sided thickers.  The Sand color looks so much like the real thing I couldn't wait to try it.  It is very messy in the same way as glitter or heat embossing so you need to cover the area.  On the other hand, it is as easy to use as it is messy so worth the effort.
This is a picture of the product.
The next is a layout I did using the double sided thickers for the title in blue.  The strip beneath the title that looks like sand was done by applying glossy Mod Podge to sandy colored paper then shaking the Mudd Puddles over the area.  Any over shake can be funneled back into the jar for later use.  After the first coat of Mod Podge dried, I applied a second coat to set the sand.  Once it was dried I applied the title with Terrifically Tacky Tape, nothing else seemed to want to stick.  
We spend a lot of time at the beach so this set was perfect for many of my pictures.  Here is my finished beachy page, I took to this product like a Lab to water!  It may not be a new product but it is new to me and I love the result.
 

Friday, May 25, 2012

From Trash to Treasure

Cindy here!  It always amazes me what other people throw out.  I'm sure it's the crafter in me, but I have a tendency to look at 'garbage' much differently than my non-crafty friends do.

Here is a gift box and card I made recently.  I used four items that many people would throw away.  Can you guess what they are?


The box once held Girl Scout cookies....


... and I used a pill container, empty roll of tape and a drinking straw for the stamping.


Here's a gift bag I made using the empty tape roll, the straw and one more item:


The third (orange) stamp was an old sponge dauber.  You know what they say: one man's trash is another man's treasure.  Why spend money on circle stamps when these are free and just as cute?!


Here's a sympathy card I made.  Check out the 'patterned paper' on it.


It's actually the inside of security envelopes!  Thanks to Pamela #8040 for the inspiration!

 
From trash (well, recycling actually) to treasure!  


Wednesday, May 23, 2012

Designer Showcase: Butterflies!

Who doesn't love butterflies fluttering on a scrapbook page? I love 'em! Maybe it's not your favorite but I think you will find these examples by our contributors great ways to use butterflies on your pages. Check out these great projects.


Cindy created these adorable cards with neat butterflies. Here is how she created them ...
"For the blue card, I punched out the three butterflies from scraps and
put them on a chalked background.  Details here:
http://www.cindyderosier.com/2012/02/secret-agent-004113.html"

"For the yellow card, I used the punch to make a mask.  I used two
shades of ink to create a butterfly background paper.  Details here:
http://www.cindyderosier.com/2012/05/national-scrapbook-day-wrap-up-part-2.html"
 
 
Nancy created this sweet. Notice how well the butterflies textures match the background texture. What is a nice touch. Also the blooms look so pretty to go along with the flying butterflies.
 Nancy's second page again shares sweet photos of her daughter along with butterflies and blooms.  The seem to be floating on the page in her example. I especially like her color palette she chose on her page.  Just perfect!
Marlene created this pretty card with a gorgeous butterfly. I like the black border around the butterflies and the title. That really ties the card together.
The butterflies in this next page by Marlene look great all embossed and set on the corner of the photo. The accents on her page go perfectly with the butterflies!
Marlene's third page features creating a butterfly out of butterfly paper. This is such a neat idea. Notice how she centered the butterfly within the other. The both seem be flying onto the page!


Here are two pages by me showcasing butterflies. The first one representing the "flying" that I was trying to do while the second represents my growth as a person.
 
 
Get out those butterfly papers, stickers, stamps and accents and add them to your next page. You will be glad you did! 

Tuesday, May 22, 2012

You might be P-interested!

Hey all, it's Pam here with some cool news. IFS has started a pin board in Pinterest which will make it much easier to see tutorials rather than just looking at the title. And now you can do both! This is a link to the original tutorial list.  Now please visit the pinterest board here at http://pinterest.com/ifsblog/ to see them in photos. I am still working on getting the last of the tutorials up there and then I will be working on the sketch/templates. Don't forget to follow the board to see all of the newest pins!

IFS will also be looking for projects from readers to pin!! When you leave a comment, please leave your gallery link OR blog link so we have a chance to see all of your great projects. You never know when you might get pinned.

Remember, please visit our new board at http://pinterest.com/ifsblog/ and follow if you want to keep up with the latest pins!!  Have a great day!

Monday, May 21, 2012

New Contributor!

Hey there and happy Monday! It's Pam here announcing our newest contributor to the blog! I have had the honor of meeting her once in Michigan (while she was visiting the US) and I am super excited to have her here as she is talented scrapbooker. I know you will love her posts and projects as I do. You can visit her blog here: http://lslywalker.blogspot.com/ and her gallery here to see more of her beautiful work.


Hi my name is Lesley I have been happily married to my husband for 41 years and have 2 daughters and 3 grandchildren.  I have been scrapbooking and stamping for about 10  years,  I have never settled into any particular style but like to try anything that is the trend at the time.  I also love quilting and travelling.

I live in Tasmania, a tiny Island at the bottom of Australia in a small seaside town.  So what better way to fill in my time than by scrapbooking.  I don't do much 'off the page' projects or cards, although I do tinker with both occasionally.  Being the grandmother of 3 gorgeous grandchildren I am never short of photos to scrap and have little time for other projects although I have a mountain of travel pictures waiting to be scrapped.  Am very interested currently in the Mixed Media techniques and also love layering and fussy cutting, and of course flowers on pages.  However, I also love clean line pages using templates especially on my 'boy pages', and often use sketches for my inspiration.

Here are a couple of pages I love that she submitted as reader's pages using templates from the blog!


Welcome Lesley to Ideas for Scrapbookers. We are lucky to have you!


Friday, May 18, 2012

Easy Glitter Butterflies

Hi, Vicky here blogging today with easy tips for creating pretty butterflies.


Supplies needed:

- 3 butterfly cut outs (all the same size) using a "double" punch and/or die that has punched out areas within the butterfly itself - aka "holes" in it (I am using the Martha Stewart double monarch punch)

- White or cream cardstock (1 butterfly cut from this color) and another color of choice (2 butterflies cut from this color)
- A small font script stamp and dark brown ink- Stickles
- very fine tip glitter glue (not distress) in a complementary color to you cardstock choices
- Adhesive half pearls or bling - a complimentary and/or neutral color to your cardstock choices
- wet glue with a fine tip


Instructions:


STEP 1 - Stamp your white/cream butterfly with your script stamp and then glue a colored cardstock butterfly behind it to slightly reveal a color "shadow" at the top of it. Only glue at the centre of the butterfly's body (not the wings)STEP 2 - Glue - the second colored cardstock (again just at the middle) behind the first two layers to slightly reveal a color "shadow" at the bottom of of it.
 
STEP 3 - Add bling or pearls to the middle and fill on the "holes" with your Stickles. The Stickles will glue the first two layers together but allow you to create dimension on your project by bending the bottom layer back and the top 2 layers forward. Sorry for the shadows but I took the picture in direct sunlight to show you how it shimmers. 
OPTIONAL: use wire for antennas (hint: use the stems from flowers you buy).